Reviving Leonid Afremov® Paintings
Reviving Leonid Afremov® Paintings
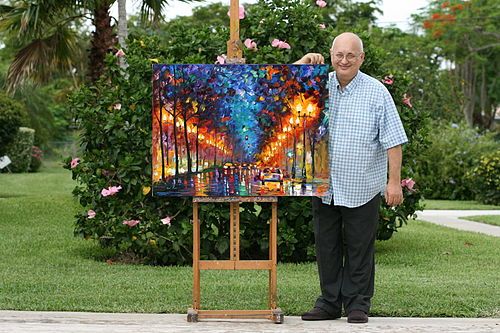
Leonid Afremov ®(born 12 July 1955 in Vitebsk, Belarus - Died August 19th 2019 , Playa Del Carmen, Quintana Roo, Mexico) is a Russian–Israeli modern impressionistic artist who works mainly with a palette knife and oils.
Using his unique painting technique and unmistakable blotchy, dotty style, Afremov created paintings that seem to explode into millions of bright colors.
I have been admired his talent for years, the bright color caught my eyes and also raised my interest, does recently developed neural network algorithms have the ability to create such art ?
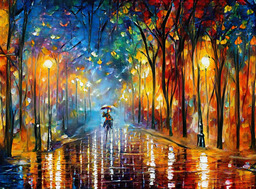
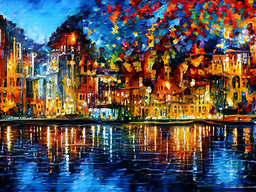
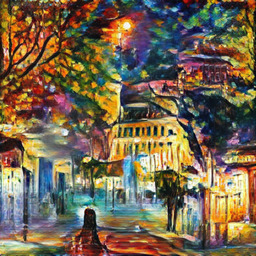
Results From VQGAN & Conditional Transformer
https://github.com/CompVis/taming-transformers
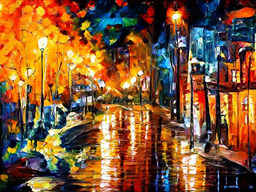
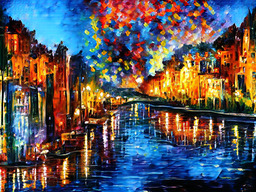
- mixed two artwork compositions
- Composition according to original artwork, slightly enlarged canvas
- Composition enlarged canvas size linearly
- Composition enlarged and free draw with imagination
How does the painting colors work
Yes, it’s really bright and vibrant, but why ?
Normally speaking, a night should be dark and gloomy, obviously
And with great contrast, there are lights so bright, and
- To make grounds bright and vibrant, there must be rainy weather, reflects the street light
- Or choose water to make reflections
- The tree leaves can reflect street light colors, and usually covers the sky
- Don’t make the sky total dark, some dark blue serves well
- Buildings at night combined with street light
So far so good, these things are cool for a colorful night
Let’s say, to get a painting done with this vibrant color, we need
- road
- water
- trees
- sky
- buildings
- street light
And not other fancy catagories, we will explain this later
How does the painting be composed
But wait, a mixture of those stuff catagories composed randomly counld not cast the magic, I have failed lots of times figuring out why
Q1: How to make the ‘road’ section exactly a third of the canvas, matching the perfect ratio
A1: Give a low angle shot near the ground, imagine you are sitting on the ground
Q2: The sky area is dark, how do we make it brighter
A2: Make the tree leaves cover the sky, reflect the street light, autumn or something
Q3: Street light could not possibly have that brightness to lit up all sky all leaves
A3: Nobody cares, just draw a few street light symbolically
So think about these, we got
- There could be low angle shot near the ground, surely affects everything all stuff catagories, so don’t compose low angle road with normal angle buildings
- Trees are everywhere, designed as a brighter sky alternative, there wouldn’t be colorful sky in large area alone
- Street light catagory does not decide the overall lighting, the whole canvas will be lit up even without any street light
Let’s see how these affect our experiment
Training To Paint
https://github.com/CompVis/taming-transformers
Using custom_vqgan.yaml on collected leonid afremov paintings with following augmentations
- All leonid afremov paintings are resized to smallest side size 460
- Enable random crop, with a size of 256x256
- Enable random flip
- Disable color jitter, rotation
And trained on one single GTX1080 Ti GPU, batch 1 (if you got better GPU, try more), around 1,000,000 iters
However, it’s low resolution and we got no control of the composition yet
Training To Compose
First we need to create the segmentation annotation for the leonid afremov paintings
Just like the sflickr dataset
Luckily the extract_segmentation.py under scripts folder could do the trick, right ?
This script fetch pretrained deeplabv2 model to extract segmentation from the raw image
But sadly, it performs really poor on artistic paintings, especially color vibrant oil paintings
So I handcrafted 25% amount of annotations for the leonid afremov paintings, then trained a segmentation deeplab model to do the rest
https://github.com/kazuto1011/deeplab-pytorch
Got the segmentation annotations at last
Then we train a cond model with sflckr_cond_stage.yaml, it was fast, it converges really quick
And finally use the previous vqgan && cond_stage model, to train the final Net2NetTransformer (See https://arxiv.org/abs/2012.09841 for why)
model:
  base_learning_rate: 4.5e-06
  target: taming.models.cond_transformer.Net2NetTransformer
  params:
    first_stage_key: image
    cond_stage_key: segmentation
    transformer_config:
      target: taming.modules.transformer.mingpt.GPT
      params:
        vocab_size: 1024
        block_size: 512
        n_layer: 24
        n_head: 16
        n_embd: 1024
    first_stage_config:
      target: taming.models.vqgan.VQModel
      params:
        embed_dim: 256
        n_embed: 1024
        ddconfig:
          double_z: false
          z_channels: 256
          resolution: 256
          in_channels: 3
          out_ch: 3
          ch: 128
          ch_mult:
          - 1
          - 1
          - 2
          - 2
          - 4
          num_res_blocks: 2
          attn_resolutions:
          - 16
          dropout: 0.0
        lossconfig:
          target: taming.modules.losses.DummyLoss
    cond_stage_config:
      target: taming.models.vqgan.VQModel
      params:
        embed_dim: 256
        n_embed: 1024
        image_key: segmentation
        ddconfig:
          double_z: false
          z_channels: 256
          resolution: 256
          in_channels: 182
          out_ch: 182
          ch: 128
          ch_mult:
          - 1
          - 1
          - 2
          - 2
          - 4
          num_res_blocks: 2
          attn_resolutions:
          - 16
          dropout: 0.0
        lossconfig:
          target: taming.modules.losses.DummyLoss
During training, I enabled shift_segmentation=True to deal with 255 unlabeled data, so when sampling add segmentation = segmentation + 1
Sampling
Prepare your own segmentation annotation file, beware these restrictions:
- You can not go too far from original painting compositions, modify the original segmentation is a good place to start with
- It can generate larger resolution images, but that does not mean larger object with tiny details, enlarge the canvas size but not object size
- Don’t try to compose wrong catagories together, remember the low angle magic stuff we talked about earlier ?
- It will always generate similar contents compared to original paintings, like the previous shown second one, it nearly reconstruct the original painting, you can not draw something ‘that original’ from leonid afremov himself
If training with shift_segmentation, full script as follows:
#!/usr/bin/env python3
import datetime

from omegaconf import OmegaConf
config_path = "logs/2021-09-23T01-40-23_lxj616_net2net_leonid/configs/2021-09-23T01-40-23-project.yaml"
config = OmegaConf.load(config_path)
import yaml
print(yaml.dump(OmegaConf.to_container(config)))

from taming.models.cond_transformer import Net2NetTransformer
model = Net2NetTransformer(**config.model.params)

import torch
ckpt_path = "logs/2021-09-23T01-40-23_lxj616_net2net_leonid/checkpoints/last.ckpt"
sd = torch.load(ckpt_path, map_location="cpu")["state_dict"]
missing, unexpected = model.load_state_dict(sd, strict=False)

model.cuda().eval()
torch.set_grad_enabled(False)

from PIL import Image
import numpy as np
#segmentation_path = "data/sflckr_segmentations/norway/25735082181_999927fe5a_b.png"
segmentation_path = "lxj616_seg/lxj616_leonid_02.png"
segmentation = Image.open(segmentation_path)
segmentation = np.array(segmentation).astype(np.uint8)
segmentation = segmentation+1
segmentation = np.eye(182)[segmentation]
segmentation = torch.tensor(segmentation.transpose(2,0,1)[None]).to(dtype=torch.float32, device=model.device)

c_code, c_indices = model.encode_to_c(segmentation)
print("c_code", c_code.shape, c_code.dtype)
print("c_indices", c_indices.shape, c_indices.dtype)
assert c_code.shape[2]*c_code.shape[3] == c_indices.shape[1]
segmentation_rec = model.cond_stage_model.decode(c_code)

codebook_size = config.model.params.first_stage_config.params.embed_dim
z_indices_shape = c_indices.shape
z_code_shape = c_code.shape
z_indices = torch.randint(codebook_size, z_indices_shape, device=model.device)
x_sample = model.decode_to_img(z_indices, z_code_shape)

import time

idx = z_indices
idx = idx.reshape(z_code_shape[0],z_code_shape[2],z_code_shape[3])

cidx = c_indices
cidx = cidx.reshape(c_code.shape[0],c_code.shape[2],c_code.shape[3])

def save_image(s):
  s = s.detach().cpu().numpy().transpose(0,2,3,1)[0]
  s = ((s+1.0)*127.5).clip(0,255).astype(np.uint8)
  s = Image.fromarray(s)
  s.save("/workdir/tmp/sample_out_top10_" + str(datetime.datetime.now().time())  + ".png")

#temperature = 1.0
temperature = 0.7
top_k = 10
update_every = 50

start_t = time.time()
for i in range(0, z_code_shape[2]-0):
  if i <= 8:
    local_i = i
  elif z_code_shape[2]-i < 8:
    local_i = 16-(z_code_shape[2]-i)
  else:
    local_i = 8
  for j in range(0,z_code_shape[3]-0):
    if j <= 8:
      local_j = j
    elif z_code_shape[3]-j < 8:
      local_j = 16-(z_code_shape[3]-j)
    else:
      local_j = 8

    i_start = i-local_i
    i_end = i_start+16
    j_start = j-local_j
    j_end = j_start+16

    patch = idx[:,i_start:i_end,j_start:j_end]
    patch = patch.reshape(patch.shape[0],-1)
    cpatch = cidx[:, i_start:i_end, j_start:j_end]
    cpatch = cpatch.reshape(cpatch.shape[0], -1)
    patch = torch.cat((cpatch, patch), dim=1)
    logits,_ = model.transformer(patch[:,:-1])
    logits = logits[:, -256:, :]
    logits = logits.reshape(z_code_shape[0],16,16,-1)
    logits = logits[:,local_i,local_j,:]

    logits = logits/temperature

    if top_k is not None:
      logits = model.top_k_logits(logits, top_k)

    probs = torch.nn.functional.softmax(logits, dim=-1)
    idx[:,i,j] = torch.multinomial(probs, num_samples=1)

    step = i*z_code_shape[3]+j
    #if step%update_every==0 or step==z_code_shape[2]*z_code_shape[3]-1:
    if step==z_code_shape[2]*z_code_shape[3]-1:
      x_sample = model.decode_to_img(idx, z_code_shape)
      print(f"Time: {time.time() - start_t} seconds")
      print(f"Step: ({i},{j}) | Local: ({local_i},{local_j}) | Crop: ({i_start}:{i_end},{j_start}:{j_end})")
      save_image(x_sample)
The result will be saved to /workdir/tmp , feel free to modify these paths

Conclusion
To some degrees, we are already possible to draw a painting
- Looks like a oil painting by leonid afremov (style)
- Composition controlled as we wish, but not breaking freely on all object catagories (composition)
- Complete training with only a few data available (only 600 paintings)
- Sample on higher resolution
References
Leonid Afremov photo collected from: https://www.pinterest.com.mx/pin/318489004868497967/
https://afremov.com/farewell-to-artist-leonid-afremov.html
@misc{esser2020taming,
      title={Taming Transformers for High-Resolution Image Synthesis},
      author={Patrick Esser and Robin Rombach and Björn Ommer},
      year={2020},
      eprint={2012.09841},
      archivePrefix={arXiv},
      primaryClass={cs.CV}
}
Leonid Afremov® is a trademark All Rights Reserved ® © TM R https://afremov.com/Trademark.html
All painting image used for training collected from fineartamerica.com low resolution review, with watermark on image, training painting image and pretrained model are not provided in this article
Generated machine learning image are highly similar with Leonid Afremov original paintings, but not identical, for academical research only, author of this article does not affiliate with Leonid Afremov®, please do not redistribute the machine generated image either